All you need :-
- Juices from roasted turkey, made with "Turkey Seasoning Trinidad Style".
- Water from boiled vegetables (or vegetable stock, or plain water)
- plain flour
Method - 10 mins cooking time
- After you lift out turkey from roasting tin, keep the juices in the tin.
- Put the tin on a ring on the hob, and heat tin with turkey juices in it.
- Lower the heat, and add one table spoon of flour at a time, stirring to prevent it sticking to the tin. Stir in more flour if needed until all liquid is absorbed, and mixture is not runny.
- Continue to stir for about a minute, so that flour mixture cooks a little, but not let it get too firm.
- Add half a cup of water and stir quickly so that mixture becomes smooth. If lumpy, use a whisk to break up lumps.
- Add more water and keep stirring.
- Repeat this process until the consistency is thick and runny, but not too thick.
- Pour into a warm gravy boat, and serve with roast turkey and vegetables.
Enjoy!
Have a very Happy Christmas.
About Me

- Marilyn Rodwell
- The Wedding Drums - my novel set in an early 20C village in Trinidad is almost here. Two young girls, Amina and Sumati plot to escape their arranged marriages and plan to live life following their own dreams. But Sumati falls in love and runs away, putting Amina's plans in jeopardy. Neither of them bank on what is in store for them. Soon they face the adult world of scheming men, corruption, prostitution and violence, and life in the village will never be the same again.
Friday, 21 December 2012


Friday, 14 December 2012
Cooking Instructions for Turkey - Trinidad Style Seasonings
You can do this preparation the night before, or on Christmas morning. But I do it the night before, so that all is ready to pop it into the pre-heated oven in the morning.
This method give you a juicy, succulent and tasty turkey.
{Check Turkey Seasoning - Trinidad Style, by clicking it on the right}
These cooking instructions are for a turkey that is only stuffed in the neck cavity. Stuffing the body cavity increases the cooking time, as well as the chance that the turkey will not be thoroughly cooked. Besides, extra cooking time also means that the extremities like legs and wings become over cooked, dry and fall off.
Use extra strong, wide tin foil (turkey foil)
A very large metal roasting tin - (make sure it will fit in your oven)
Cut a large piece of tin foil, measuring about one and a half times more than needed to wrap the turkey.
Cut another piece, a bit larger than the first.
Note - Always make sure that the shiny side of tin foil what is close to the food.
- Place the larger piece along the length of the roasting tin, (shiny side up), and mould loosely into the shape of the tin.
- Place the smaller of the two pieces of foil, across the width of the tin over the first piece. (shiny side up)
- Pour some oil generously and rub with hands to grease the tin foil making sure that all exposed foil is greased. This prevents it from sticking on to the skin of the bird.
- Remove turkey from marinading bowl or bucket, and place in the roasting tin.
- Collect all lumpy bits of marinade and spread over the turkey, leg crevices, breast, pockets, and inside. (Don't throw it away)
Make a tent with the tin foil around the turkey
- Take the piece of tin foil closest to the turkey and bring together across, but not touching the turkey. Fold edges over leaving a space around the turkey inside the tent.
- Bring the bottom tin foil around the top and fold over tightly, forming an airtight tent over the turkey.
Pre-heat oven to 220C, or 425F, or gas mark 7
These are the roasting times for a 12-14lb turkey. It will take about 5 hours in all. Calculate the time you want to have lunch, and work 5 hours backwards to calculate what time to put it in the oven. So if you want lunch at around 2pm, add half hour for standing time. So, you want it cooked by 1.30pm. That means it should go into the preheated oven at 8.30am.
- Place prepared turkey in the centre of the preheated oven for 40 mins.
- Lower the oven to 170C, or 325 F, or gas mark 3, [for the next three and a half hours].
- During this time, remove tin from oven after one hour. Open tin foil gently keeping your hands away from the steam. Baste thoroughly with the juices in the tin after one and a half hours, and close back tightly. Replace in oven.
- Repeat the same process in another hour.
- Repeat basting process after another hour.
- After 4 hrs 10 min in the oven (i.e. in the last 50min), open the tin foil and fold back to expose the turkey. Then, replace it in oven.
- Turn up oven temperature to 200C, or 400F, or gas mark 6. Baste at least two times during the last 50mins.
- To test if cooked, pierce the thickest part with a metal skewer or a thin long sharp pointed knife - in the centre of breast, and through the side of the leg joint to make sure the juices run clear or not at all.
- When finished, remove from oven and leave turkey to stand in pan with juices for 20-30 mins.
- Lift turkey out with two large forks and help if you have it, and on to a carving dish. Be careful as it will be very heavy.
KEEP JUICES! DO NOT THROW AWAY. THIS MAKES THE MOST DELICIOUS GRAVY.
I WILL PUT MY GRAVY RECIPE ON HERE BEFORE CHRISTMAS.
If you have any questions, please ask!
Have fun!

Tuesday, 11 December 2012
TURKEY SEASONING - TRINIDAD STYLE
Here is a recipe for seasoning and marinading whole turkey ready for roasting. It makes the turkey delicious and succulent. It is what my mother used to do, and the aromas are still very powerful for me at Christmas. This is a most important routine for me, and makes my kitchen smell Christmassy.
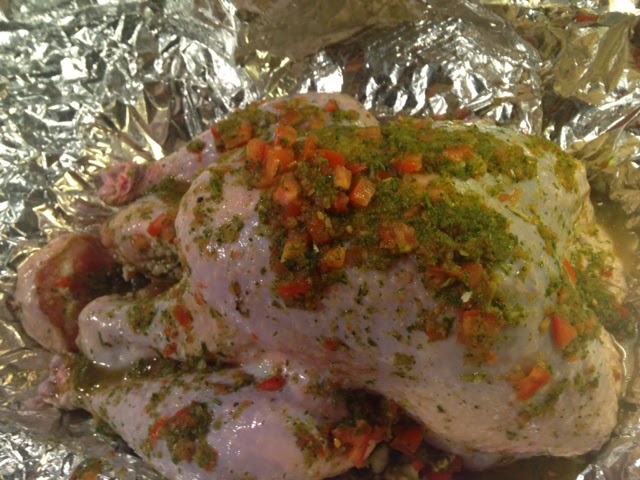
Prepare the evening before.
This amount of ingredients will do for anything up to a 12 lb turkey, but you can use a bit more. For me, you can't have too much thyme.
For a 12 -15 lb turkey, add another half the amount of ingredients. E.G. one and a half handful of fresh thyme, etc.
Ingredients
- Large handful of fresh thyme sprigs
- Large handful of fresh parsley
- 2x5" sprigs rosemary (optional)
- 2 large fresh tomatoes
- 1 table spoon fine sea salt (or 2 table spoons flake salt)
- half teaspoon ground black pepper
- large onion chopped fine
- 2 tablespoons vegetable oil
Utensils
- Preferably, use a mortar and pestle. (A liquidizer will mince it all up too much)
- Chopper or large knife.
- Chopping board
- Large roasting dish. Preferably stainless steel.
- Turkey tin foil (strong and wide)
Method
Wash herbs and tomatoes.
- Pull off all small leaves from sprigs of thyme by pulling downwards against the stem, and put leaves on the chopping board. Throw away stalks.
- Trim stalks from parsley, and add leaves to heap of herbs
- Pull leaves off rosemary stalks, and add to herbs.
- Use chopper or large knife, and chop all herbs finely.
- Cut up tomatoes into small pieces
- Place all ingredients above into a mortar and pestle, or a strong Pyrex type bowl.
- Add chopped onions.
- Using pestle, pound and grind ingredients by hand until mushy and runny, but not totally ground. It should remain lumpy and crushed, but not liquidized.
- Add salt and pepper, and continue pounding for a minute.
- You should be able to smell the delicious aroma of all the herbs, tomatoes and onions.
- Wash turkey and pat dry with kitchen paper.
- Loosen the skin around the top of the breast area making a few long spaces between skin and flesh.
- Using hands, take the seasoning mixture and rub all over turkey, inside and outside. Pushing in seasoning mixture inside pockets you've made in breast area. Season inside turkey body also.
- Cut a very large piece of tin foil and place inside tray. Rub with oil, apart from edges.
- Place turkey on foil.
- Wrap foil very loosely around turkey, Seal by folding an inch of foil around turkey. Leaving enough space inside of top (about 2 inches), so that the hot air can circulate while cooking.
- Put it in a cold room or fridge overnight until ready to cook the following morning. (Make sure it is well away from domestic animals or rats and mice. You could put it in a large plastic storage box)
- Follow whatever cooking instructions you have, allowing enough time for turkey to stand for about half hour before lunch.
While cooking, open and baste thoroughly at least twice during cooking time.
Would you like my cooking instructions, or How to make gravy from the delicious herby juices? Leave me a comment.
Hope this goes well for you.
{I have now posted the Turkey Cooking Instructions. Just click on it on the right.}
Wednesday, 21 November 2012
What I have Observed about Stereotyping Characters
Creating characters can be fun. But believable characters are essential to the reader in any type of fiction. In the absence of photographs, pictures or other types of visuals, believable characters are created by words - so, how we describe our characters, and what we tell about them, what they say, how they say it, and their actions, are important.
Unless we want the reader to imagine it all, our characters must have physical appearance, a voice, thoughts, and feelings. Of those, physical appearance is easy for the reader to imagine, but voice, thoughts and feelings, are not. What they look like, what they wear, how they speak, what they think, and how they feel, individual quirks, are all important factors when creating three-dimensional characters. When the character is introduced to the plot, s/he should take over and come alive. By allowing the character to speak and act, the author gives them birth and existence. When they have life, they have personality and motivation. When we achieve this, the character will often take over, and do and say things the writer never thought to write. When this happens,it is pure magic!
STEREOTYPING IS FROWNED UPON IN SOCIETY.
How we depict our characters is important to how our readers grasp who they are. Using stereotypes enables the reader to quickly grasp the personality type. But some readers do not agree with or appreciate the use of some stereotypes, because many are negative, unhelpful, destructive, and create a barrier, in real life. EG - Fat women are greedy; or, Homosexuals are promiscuous., or, Lawyers tell lies.
Stereotyping is an exaggeration of some small observation of some individuals in a sector in society. So should we use it in our writing at all? Some readers find any stereotyping unacceptable. Even positive ones, because they are too much of a generalisation, and can be misused or cause misinterpretation. This is true. But is it ok to use stereotypes sparingly?
Many well known authors are guilty of stereotyping to some extent - small or large. And I believe this is why. They do it in order to create a quick characterization. To depict in a flash to the reader, what kind of man, woman, or child the character might be. This enables the reader to predict the behaviour of that character, for good or bad, and go along with what the writer has initially set up as the personality-type. The reader might even expect to predict an outcome for a given scene or even the whole novel - now they know the personality type.
But not all readers want this, nor do they want to predict the end, or the end of every scene, or the outcome of a behaviour of a certain character. So authors must know their readership, their genre, and therefore the expectations of the readers. Readers who do not like stereotyping, will not pick up a genre to read because of this, or an author who regularly stereotypes the characters in his/her novels. And authors who want to sail close to the wind on this, should realise this. Especially cross genre authors who want to attract a wider readership than their own regular market.
In modern novels, stereotyping seems less offensive in genre and commercial fiction. But even then, stereotyping should be done with care and sensitivity to the reader, who may take it personally, or broadly disagree. So it depends on how heavy the author relies on it for characterisation.
Readers of Literary fiction are more critical of stereotyping. The slower pace of literary novels together with the general nature of the Literary readership means that they are more accepting of characters who are not of a particular personality-type, or have set and predictable traits and behaviours, because, these readers invest more time in reading that slow-paced novel. In other words, the reader prefers characters who are more realistic rather than superheroes, who nearly always behave perfectly, and always get the girl in the end. Literary readers are more willing to go along with personalities that are closer to real people, less predictable, maybe appearing erratic at times, whilst serious and completely sober at other times. The character whose flaws seem too great to overcome. The varying behaviours depending on circumstance ... or maybe not. But it on the whole, it must make some sort of realistic sense.
Deeper understanding is crucial in literary characters - e.g. a person's past might be relevant to volatile behaviour and will affect their actions in the present and future. Circumstance and underlying issues are as essential as is change in character behaviour, as the plot continues. Literary readers want to see some change occurring during the course of the plot, because they too want to justify any deviation from reasonable behaviour at the end. It's only human. But none of this is absolute. It is one of the differences between Commercial fiction characters, and Literary characters. In the end, Literary readers are more willing to put up with more uncertainty, and less predictability, while Commercial readers are just the opposite. In general.
This is why stereotyping works for more Commercial fiction than Literary. It is an easier way to slot in characters so that our readers discover quickly who they are, and what to expect, and then move straight through a fast plot. But even then, the author must be careful. Readers are not stupid, and have their own individual views. And many Commercial readers as well will not tolerate deep over-stereotyping. But Literary readers go even further, and are more discerning and far less tolerant. And as they plough through a novel painstakingly, they do not expect to have to predict for themselves, but expect more from the author's ability to stretch them on many levels of understanding, even though the plot might be light.
Personally, as a reader, I want the author to work hard at gaining my approval. And to be perfectly honest, why ever not? I will have invested time and money in that novel. (Though not as much time as the author has!) But readers rarely realise this as they seek satisfaction from the novel they've just read.
Monday, 19 November 2012
How I am trying to fix and edit the first chapters of my novel
First of all, I have changed the title again. Now, The Last Year of Childhood.
I am also rewriting the early chapters of the novel. Maybe the first 6 or 8 chapters. So far, I have got to Chapter 3. I think on balance it is much improved.
First chapters in a first draft, prove difficult to me. Often it is where a lot of stuff get dumped together, and cause it to be lacking in a proper structure...although at the time of writing, it seemed good. The first chapters are where I try to introduce the important characters, and where the minor ones creep in and take over where they shouldn't. Also, it is where I try to give them personality, intention, and a position in the plot. It is where I am also setting up the plot ...maybe somewhat haphazardly, and where, more often than not, the background always seems an important aspect to include in order to help the reader understand where I'm coming from, and the world of the characters. Setting too, takes some space in these chapters, and therefore some description...maybe too much description. As character-voice helps make each character individual and unique, dialogue is important very early on.
But none of it is good enough in the first draft, so hence the rewrite.
I have been restructuring, and making sure that my Main Character is not overshadowed by minor ones. That the Point of View is mainly from her perspective so as not to confuse the reader with head hopping. This is considerably easier, as in this rewrite, I am not introducing too much pertaining to the other secondary characters who are also important in the plot. They will have their turn and be introduced gradually. Also, I am leaving the backstory until well after the first 3 chapters, so as not to clog up the flow of the MC's story with flashbacks or backstory.
I have decided to post a paragraph that appears in my new Chapter 3. The novel is set between 1917-18, in a village in Trinidad.
Freedom to go to school again was probably going to be the most significant memory in her life, and the one she would speak of with nostalgia. Latchmin realised that day, that opportunities like that didn't come more than once in a lifetime. If she didn't grasp it fully, it would slip away like water over a rock, impossible to return after it was gone. How could it be possible to return to school once you've left school to work or to marry? It didn't need much more thinking. To her the answer was now easy. Though for many others, they never stopped to think about it long enough, but drift towards the next part of life like a stream flowing into the hollows of a well worn riverbed.
That first morning back at school, Mr Clifford acknowledged her with a verbal welcome, a nod as she went past, and a smile. Latchmin followed her line into her class and sat down. When the teacher began, she savoured every moment of classwork, like the first real meal she had ravenously devoured after recovering from typhoid.
Friday, 26 October 2012
Easy Tasty Herby Roast Potatoes
EASY TASTY HERBY ROAST POTATOES (4 people)

4 large or 6 medium potatoes - wash and peel
4 fresh rosemary sprigs
1 large onion - slice lengthways in half, then slice downwards in long slithers
half tsp onion salt
2 tablespoons olive oil
- Heat oven to 200C
- Cut potatoes across and lengthways, and keep in large chunks (about 1 inch x 1 and a half inches)
- Put potatoes in baking tray
- Add olive oil
- Chop rosemary finely, but unevenly, leaving some pieces quite large
- Add chopped rosemary to potatoes
- Add onion slithers
- Add rest of ingredients
- Mix thoroughly with hands
- Put in oven and cook for about half hour, turning potatoes after 15 mins to even the browning.
- Stick in a sharp knife to make sure they are cooked.
** Please Note, these are very morish. Do a few more potatoes than you would normally do. They're also lovely when eaten at room temperature or cold.
Thursday, 18 October 2012
Marilyn's Very Tasty Quick Paprika Chicken Wedges

3 large chicken breasts (boneless)
1 tablespoon oil (vegetable or olive)
half teaspoon onion salt
2 cloves crushed garlic
2 teaspoon paprika
1 tablespoon soy sauce
- Switch on oven to 180 C.
- Wash and cut chicken into wedges no thicker than half inch at the thickest point.
- Put it into a heavy baking tray
- Add all the other ingredients
- Using hands, mix thoroughly till all pieces are coated
- Leave to stand for 20 minutes, if you have time
- When oven is heated, cook in the middle shelf of oven for 20 minutes, or until cooked but pieces are still soft.
(To check if cooked - Stick a sharp knife into the thickest part of a few of the pieces. If you have no resistance, and no liquid runs out, it is cooked.)
Subscribe to:
Posts (Atom)